Point-to-Point Swags
Beauty and Versatility in One Gorgeous Package
|
I love point-to-point (PTP) swags. Also known as Necklace swags or Drapery swags, they are extremely versatile while adding a dramatic detail to any treatment. They add graceful lines to a panel as a necklace swag, but can also stand alone for a light and casual treatment. Surprisingly, the swag is also operable. The basic cut of the pattern allows it to open and close with traversing draperies.
Versatility best describes the Point-to-Point swag:
The PTP swag is best known as a Necklace or Drapery Swag. It is hung in front of a panel, adding a level of interest and impact.
Trim is optional. But these swags look best with long luxurious trim. The trim adds weight both visually and physically. The visual impact is dramatic. The physical weight helps the folds drape to their full length.
Long PTP swags drape beautifully when cut on the straight of grain. The weight of the fabric and the cut of the pattern work with the fabric to drape out the folds.
|
|
A very long and dramatic PTP swag, in proportion to a long panel, enhances the overall look. It can be in the same fabric, adding interest in terms of horizontal folds against the vertical folds of the panels. Or, it can be made up in contrast fabric, adding a striking custom look. The PTP swag over a panel is a beautiful custom look for the client and adds to the value a designer can bring to his or her work.
This diagram illustrates how longer swags look so much better proportionately than standard length swags when paired with extra-long panels.
|
|
It is an operable swag on traversing panels. The pattern cut allows this swag to ‘open and close’ with traversing panels. Simply fabricate one swag for every 5-7 pleats (1 – 1.5 widths of fabric) on a panel and mount them side by side, sharing rings. The result is stunning. Your client wants traversing panels and the look of swags. This gives them the best of both worlds without a lot of heavy hardware and boards.
|
|
The scarf swag, a long rectangle of fabric which is pleated and dressed to look like swags mounted from medallions is incredibly time-intensive to dress and cannot easily be removed for cleaning.
A savvy workroom uses the PTP swag style to draw out the actual swag pattern shape between each medallion. It is much easier to install and the overall finished treatment dresses beautifully.
|
|
The stacked pleats of a PTP swag also enable it to transition beautifully into asymmetrical and raised treatments. The methodology for drawing the pattern shape makes asymmetrical treatments very simple to cut and fabricate – with dramatic results.
|
|
The PTP swag can also stand alone in a light and airy treatment of small simple swags hung from rings with pleat stacks overlaying each other. Have a little fun with these light swags.
|

|
The Professional Workroom Handbook of Swags, Vol 1
|
If the PTP swag is so beautiful and versatile, why has it been under-utilitized by designers? The primary reason is that there have been few professional patterns available for this style. Because of the stacked pleats, it hangs and drapes differently than standard board and pole mount swags and is drawn with a different pattern shape.
|
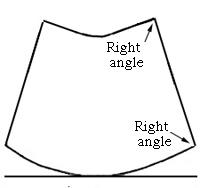
In researching this particular swag style, I realized that the secret was in how the pattern was drawn. If the four corners of the pattern are all right angles, the patternl pleats into a perfect swag of evenly distributed folds every time. Forcing right angles in the corners also minimizes the amount of fabric required to make the swag and automatically reduces the bulk in the pleat stacks. The workroom can control either the fullness in the swag or the actual number and sizes of pleats when drawing out the pattern.
|

|
The Professional Workroom Handbook of Swags, Volume 1, has very specific instructions for defining the dimensions of a finished PTP swag , calculating the pattern dimensions, drawing the pattern and fabricating the swag. It includes several options for finishing the pleat stacks. When cut properly, the PTP swag pattern pleats into a perfect swag every time. Workrooms who study and adopt the methodology in this book eliminate their dependence on professional patterns.
|
|
The instructions in the book on how to force square corners on a swag pattern are very effective, but clumsy to execute. The Square it Up! tool is designed specifically to quickly and easily draw the PTP pattern shape for any size of PTP swag. Learn more about the Square it Up! pattern drafting tool, plus a list of its many other uses in the workroom.
Return to the Sew Easy Windows articles Table of Contents page.
|


![]()